Today I am celebrating the birthday of someone very special to me! Happy Birthday, Sweet Girl! Knowing her special day was coming up, I just had to design a Super Special card for her! I think I hit the mark…what do you think?
Masks and Embossing Paste
I’ve been on a Black & White trend lately with my designs. I love the elegance it gives to a card. Plus, Black just happens to be the favorite color of my birthday girl, so.. (yes, she’s a walking statement of elegance too!) I love adding texture to my cards…so the Sweet Soire’e Decorative Masks paired with White Embossing Paste was definitely going to add just what I wanted for this card.
TIP
Applying Embossing Paste over the Masks is much like icing a cake! First step, you spread it over the mask just like you would to a cake. The second step is to use your palette knife to remove all the excess paste from the mask. Last step, carefully lift up the mask and admire your work!
Decorating with Embellishment Kits
Do you think you must create every element for your cards from scratch? I don’t! I love using the embellishment kits Stampin’ Up! offers on my cards. It’s quick. It’s easy. And the Sweet Soire’e Embellishment Kit just ROCKS! It has tassels, scalloped velvet trim, tags and these awesome foiled flowers and vellum foiled leaves! All I had to do was add some Stampin’ Dimensionals behind the flowers to pop them onto my card front. I used Mini Glue Dots to add the vellum leaves.
Celebrating with Sentiment Options
The ‘Celebrate’ sentiment was the obvious choice for the sentiment for my card. A quick 1/2″ Whisper White card stock strip, dove-tailed on one end is all I needed. I could have used any of the sentiments from the Cake Soire’e stamp set…they all would have been perfect!
THE Occasions Catalog for 2018 is here…and you’re going to LOVE IT! Check out this cute stop-motion video (I love these videos!) to see highlights of some of the awesome Occasions products!
Got Occasions Catalog?
I know you’re DYING to see the whole catalog, so if you have not received one from me (or another demonstrator) and would like one, please let me know and I will get one in the mail to you ASAP. In the meantime, you can download it simply by clicking the image to the right!
But wait, there’s more…check out this video that features fabulous stamps perfect for using with the new Stampin’ Blends:
Something to Sale-A-Brate!
Is it not enough that we have new products to drool over and purchase in the Occasions catalog? Let’s add in some FREEnew products to sweeten the deal! You know it, Sale-A-Bration is back and better than ever!
Check out this quick video highlighting a few of the products!
In case you’re not quite familiar with what Sale-A-Bration is, it’s only the biggest sale of the yearwhere you can earn free, exclusive products with every qualifying order. But this year something new has been added…Reward Levels!
SHOP – Reward Levels
In the past, for every $50 you spent, you received a free Sale-A-Bration product. But this year, they’ve sweetened the pot! Check out these reward levels:
If you spend $50, you get one free level 1 product
If you spend $100, you get one free level 2 product, OR, you can choose two level 1 items
If you spend $150, you have the option to choose three level 1 items or one level 1 item and one level 2 item
This new option allows everyone to create a personalized Sale-A-Bration experience!
If you need a Sale-A-Bration brochure, please contact me and I’ll be happy to get one in the mail to you. In the meantime, check out all the goodness HERE online!
HOST
There are also added benefits to hosting during Sale-A-Bration! Did Christmas or post Christmas bills drain the wallet? Have no fear! I’ve got a way for you to get your hands on our awesome Stampin’ Up! products for FREE!!!
Host a party with $250 in sales (kinda easy during Sale-A-Bration) and you’ll get $25 more in hostess rewards! Seriously… for just $250 sales, you’re looking at $50 in FREE Products (of your choice!) Hello? Email me to book your party NOW! Before everyone else gets your date!
Contact me today to book your party! Catalog parties count too as do your own personal order for $250 or more!
Hugs & Smiles,
Angela
Leave a comment to be entered into a Daily Drawing! Winners for each day will be posted in Sunday’s post!
It’s Monday! What better way to start (or end) what’s usually considered the worse day of the week than by stamping. It’s time for a “Make It Monday!” using one of my favorite new stamps – Happy Birthday Gorgeous! I’m excited to bring you this gorgeous card from our project sheet co-op group! It’s easy to make…and it incorporates a little technique too!
I’m excited not only because it’s such a pretty card, but because we get to use the *new* Multipurpose Adhesive Sheets! Have you tried these sheets yet? They’re such a time saver!
Adhere the Lemon Lime Twist card stock (love this new In Color!) to the adhesive sheet then run through the Big Shot using the Happy Birthday Thinlits Die. Peel off the adhesive sheet and adhere the Happy Birthday to a Whisper White Scallop Circle Framelits (used by cutting with the Big Shot).
Now let’s do a little assembly!
Start with your Lemon Lime Twist card base. Layer on top of that with a slightly smaller piece of Whisper White.
On top of that you’ll adhere 2 pieces of 2 different designs of the Fresh Florals Designer Series Paper.
Now you’ll take your Happy Birthday scallop circle and adhere it with Stampin’ Dimensionals in the center of the card.
Easy enough!
Next, we’re going to use the Happy Birthday Gorgeous stamp set to stamp the sentiment on scrap Whisper White card stock and punch out using the Classic Label Punch. We’ll adhere this under the “happy birthday” using Stampin’ Dimensionals.
Of course, you can always stamp a sentiment on additional Whisper White card stock and adhere it inside the card as well. This stamp set has so many great sentiments to choose from! If you haven’t invested in the Happy Birthday Gorgeous Bundle yet, you might want to reconsider. In fact, add a couple more items to make it $50 and earn those July Bonus Days coupons! Here’s a great $50 bundle idea:
Don’t forget to use my July Hostess Code for a free gift from me when placing your $50 (or more) order!You’ll be all set to make quick, cute and easy birthday cards. And don’t we always need more birthday cards on hand? I know I do!
..and I’m loving it! The Annual Catalog is always ‘a book’ and there’s no exception this year either! Its pages (all 233) are filled with fabulous stamp sets. More samples than ever (it must be cause I’m wanting it ALL – even sets I already own!); And lots of NEW Ribbons and Embellishments (Yay, I love to accessorize!)! If you haven’t gotten your hands on a copy yet (and you don’t already have a Stampin’ Up! demonstrator), I’d love to send you a copy. Just email me and request your copy (if you live locally to Nashville, let’s meet for coffee or a cooling beverage)!
2017-2018 Annual Catalog Facts
5 New In Colors
75 New Stamp Sets
56 New Ribbons
15 New Designer Series Papers
16 New Embellishments
7 New Textured Impressions Embossing Folders (includes 3 new Dynamic folders)
20 New Framelits/Thinlits (many bundled with coordinating stamp sets)
24 New Bundles (who doesn’t love a savings!)
Where’s the “I Want It All Button”, right? If you are not convinced yet, Check out this fun video Stampin’ Up! created showcasing new products from the 2017-2018 Annual Catalog.. Enjoy the show!
Would you like a list of all the Bundles included in the Annual Catalog? Click this link to download your list: Bundles 2017-2018
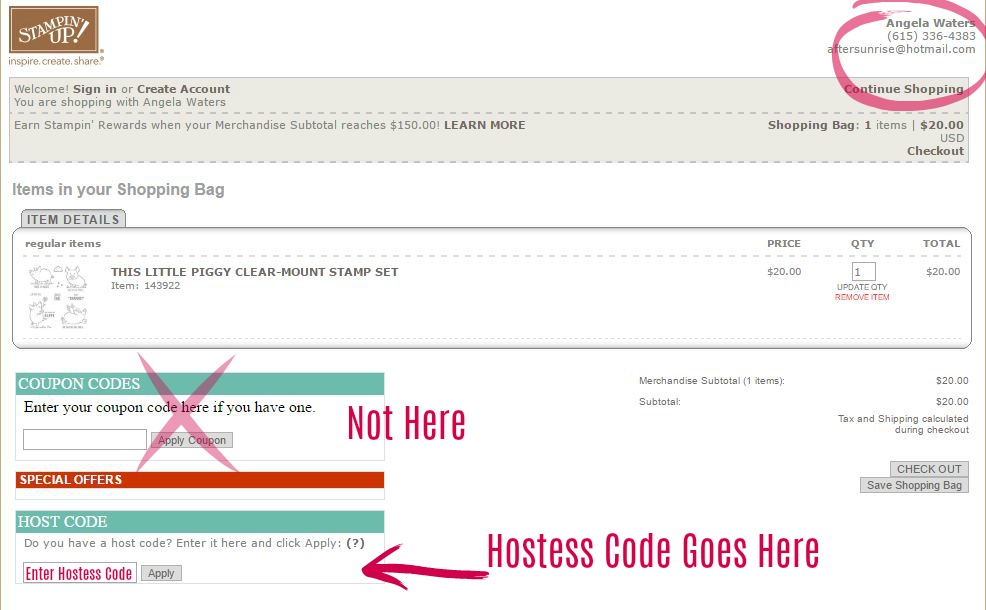
So what has caught your attention already in the Annual Catalog? Leave me a comment! Ready to order? When placing your order, be sure to use my June Hostess Code: EGM4U4DK to receive a small gift from me. NOTE: If your order is > $149, do not use the Hostess Code – you will receive Stampin’ Rewards for your order AND a small gift from me. Not sure where the Hostess Code goes? It is just below the Coupon Code (on bottom left side):
If you are a customer of mine (meaning you have purchased from me in the past), I have a StampAfterSunrise VIP Facebook Group where I share tips, ideas, games and prizes every day (or almost) exclusive to this group! Ask to join – StampAfterSunrise VIP Group on Facebook!
Glad to see you’ve come back for a 2nd helping of the Cool Treats suite! There are so many possibilities with this stamp set and dies. Our first card uses the traditional ice cream cone and makes it pop on layered ovals and that fabulous Tasty Treats Designer Series Paper. This has got to be some of the cutest paper Stampin’ Up! has had! I will be sad to see it go.
Our final card is so fun! Can’t make up your mind between a traditional sugar cone or a waffle cone? Have them both! With sprinkles even! This card uses all the products in the suite (except maybe the Peekaboo Peach Ombre Stampin’ Pad)…Tasty Treats Washi, Tasty Treats Designer Series Paper, Tasty Treats Cardstock, stamp and dies! SWEET! 🙂
Remember, this fabulous stamp set (Cool Treats) and the dies (Frozen Treats Framelits Dies) are carrying over into the new catalog, but NOT as a bundle option. So hurry over to the retirement list and see if the bundle is still available if you want to save yourself 10%.
Hope the rest of your week is as sweet as these cards!
I scream, you scream, we all scream for…Cool Treats! It’s an ice cream fest on my blog today as we celebrate the amazing Cool Treats Suite that is part of the Occasions Catalog! The good news? This adorable stamp and matching dies are carrying over into the new catalog! Yay! The bad news? They won’t be available in a 10% discounted bundle set in the new catalog. Boo, hiss! The conclusion? Run your little fingers as fast as they can go over to the retirement list and order your bundle TODAY!
Okay, are you ready for some cards that look yummy enough to eat? Get a napkin to wipe up the drool that’s about to drip down your chin and let’s get started!
Our first card is super sweet with scoops upon scoops of ice cream. I just love the way my Inking Sunrise Design Team inked up the edges of each scoop with a different color. Those embellishment sprinkles add just the right finishing touch!
Our second card is a fun Z-fold card. It’s always nice to step away from the traditional and “shake” things up a bit. This bowl of goodness is just as yummy looking as the first one….with extra sprinkles and a cherry to boot!
All you need is a spoon and you’re all set! (And the framelits dies DO have a spoon included!)
Come back later today for 2 more cards featuring our Cool Treats suite!
The content in this blog is the sole responsibility of Angela Waters as an Independent Stampin' Up! demonstrator. The use of and content of classes, services or products offered is not endorsed by Stampin' Up!